We get asked this a lot, and it’s a good question. When people talk about fixing their roof or building a new one, they often mix up the words “roof” and “roofing materials.” But here’s the thing—they’re not the same. If you’re planning a home build or repair, knowing the difference between a roof and roofing materials can save you time, money, and maybe even a few headaches down the line.
Let’s make it easy to understand, without the complicated stuff. Think of your roof like a sandwich. The roof is the whole sandwich—the complete structure that covers your house. Roofing materials? They’re the bread, cheese, ham, and all the fillings. Without those parts, you don’t have a real sandwich. Same goes for your house. Without roofing materials, there’s no actual roof to protect your home from the weather.
Now let’s get into the nitty gritty. We’ll explain everything clearly so you can feel confident talking to roofers or choosing what’s best for your place.
The difference between a roof and roofing materials really starts with what they do. Your roof is the full system sitting on top of your house. It includes:
The structure (usually made of timber or metal trusses)
The underlayment (a layer that helps block water)
The insulation (to help keep the heat in or out)
The ventilation system (for airflow)
And finally, the outer shell—the roofing materials
Roofing materials, on the other hand, are the top layer that everyone sees. They come in different shapes, styles, and textures. They’re designed to protect, look good, and match your home’s style. When people say they want a “tile roof” or a “metal roof,” they’re actually talking about roofing materials.
Here’s a quick description list to make things clearer:
Roof
The complete protective covering of a house
Includes structure, layers, and outer shell
Supports insulation and airflow
Roofing Materials
Only the outermost layer of the roof
Includes tiles, shingles, metal sheets, and more
Affects how your roof looks and performs
That’s the main difference between a roof and roofing materials, but let’s go further.
There are lots of choices when it comes to roofing materials. Each one has its pros and cons, so let’s take a look at some popular types in Australia:
1. Terracotta Tiles
Made from baked clay
Great for hot climates
Heavy, but super durable
2. Concrete Tiles
Cheaper than terracotta
Can mimic other styles
Heavier, but solid in bad weather
3. Metal Roofing (like Colorbond)
Lightweight and modern
Reflects heat
Popular for its long life
4. Asphalt Shingles
Common in the US, but also found here
Affordable and easy to install
Not as tough in wild Aussie storms
5. Slate Tiles
Beautiful and strong
Natural stone
One of the priciest options
Understanding the difference between a roof and roofing materials helps you pick the right combo. The roof itself needs to be strong and well-planned. The materials on top should suit your home’s needs—from weather to looks.
Here’s an easy table to compare:
Feature
Roof
Roofing Materials
Purpose
Covers and protects the home
Acts as top shield layer
Includes
Structure, layers, and outer shell
Just the visible outermost layer
Examples
Full system with support beams
Tiles, metal sheets, shingles
Maintenance
Involves full roof inspections
Focuses on surface wear and tear
Cost Breakdown
Higher due to full system
Varies by material type
When you understand the difference between a roof and roofing materials, it becomes easier to plan repairs, talk to tradies, and even budget better. You won’t mix up what needs fixing or upgrading, and you’ll know what questions to ask.
Let’s say your roof is leaking. You might think you need all new roofing materials. But sometimes, the leak is coming from the underlayment or poor structure. That’s why it helps to know what your roofer is talking about.
And when you’re choosing materials, think about where you live:
Near the coast? Go for corrosion-resistant materials like Colorbond.
Hot climate? Tiles that absorb and release heat slowly can help.
Storm-prone area? Choose something strong and well-secured.
Also, not all materials work with every roof structure. Some need extra support because they’re heavy. That’s why roof design matters just as much as the materials you use.
So next time someone says, “I need a new roof,” you’ll know to ask, “Do you mean the whole roof system or just the roofing materials?”
Now, if you’re looking for expert help, the team at Smile Roofing has got your back. They handle everything from inspections to installs and can help you figure out exactly what needs fixing or upgrading. You can even check their service areas if you’re not sure they cover your suburb.
Or maybe you’re just curious about what services they offer—have a look at their roofing services breakdown to see the full list.
To wrap it up, understanding the difference between a roof and roofing materials gives you an edge. Whether you’re fixing a leak, building from scratch, or just comparing options, you’ll make smarter choices and get better value.
And hey, your home deserves the best. Let’s make sure the roof over your head is built right, from the base to the very last tile.
Elevate Your Living Room Style with Elegant Wall Panels
Introduction: A New Dimension in Interior Elegance
In the world of modern interior design, few features offer the visual drama and refined charm that Elegant Wall Panels do. These versatile design elements don’t just upgrade your living room—they transform it into a stylish sanctuary. Whether you’re chasing contemporary vibes or timeless grace, Elegant Wall Panels create structure, warmth, and personality that bare walls simply cannot match. Many homeowners are turning to
beautifully designed wall panels offer a distinct aesthetic quality, providing the elegant wall panels with a touch of sophistication that enhances room decor. luxuriously textured wall enhancements bring an air of opulence, transforming the elegant wall panels into focal points for exclusive interiors. contemporary decorative wall solutions create a modern ambiance, making the elegant wall panels essential in trendy architecture. stylishly crafted wall applications exemplify craftsmanship, lending the elegant wall panels a uniquely artistic feel that influences luxurious living spaces.
beautiful wall coverings are diversifying room aesthetics for modern interiors. stunning panel designs offer seamless integration in luxury homes. attractive decor solutions enhance the ambiance of boutique hotels. elegant surface textures provide increased durability for commercial environments. sophisticated installation techniques ensure a flawless appearance for every setting.
solutions to create a stunning focal point in their space.
Why Elegant Wall Panels Are a Game-Changer in Home Design
Adding Elegant Wall Panels is more than a design trend—it’s a smart aesthetic move. They introduce a tactile experience that standard paint or wallpaper can’t provide, making your walls feel as dynamic as the rest of your decoration. Timeless
artistic wall decor has transformed the room's aesthetics. modern panel designs made upscale interior installations easier. sophisticated wall accents completed luxurious lounges seamlessly.
beautifully crafted wall decor provides a sophisticated addition to any modern living area. originally conceived facades enhance the visual appeal of several upscale hotels. perfectly appointed paneling blends seamlessly with minimalist interior designs. incredibly detailed ornaments bring the classic elegance to private residential installations. skillfully implemented surfaces reflect the artisan quality needed in luxury setups.
can transform a dull wall into a centerpiece of artistic expression.
Benefits That Go Beyond Beauty
Creates Depth and Texture: Wall panels break the monotony of plain walls.
Adds Sound Insulation: Certain materials soften echo, making rooms quieter.
Covers Imperfections: Hide cracks, dents, or uneven surfaces effortlessly.
Enhances Room Value: Stylish upgrades can boost property appeal.
Easy to Customize: Panels can be painted or textured to suit evolving tastes.
Style Inspirations: Choosing the Right Elegant Wall Panels
From rustic warmth to minimalist chic, Elegant Wall Panels adapt to any living room aesthetic. Here’s how to match panels with your personal design taste.
Classic Wood Elegance
Wooden wall panels radiate natural warmth. Perfect for traditional or transitional interiors, these bring in earthy tones and a sense of sturdiness. Be it dark walnut or whitewashed pine, wood remains a forever favorite.
Contemporary Geometric Patterns
If you’re drawn to crisp lines and bold visual interest, geometric MDF or PVC panels are for you. These structured patterns can modernize any wall and serve as an artistic statement on their own.
Soft Upholstered Panels
Velvet or linen-covered panels combine elegance with acoustics. They’re ideal for cozy corners, entertainment zones, or spaces where comfort is key.
Exploring Panel Materials: What Works Best for You?
Different materials contribute different advantages. Here’s a look at popular choices for Elegant Wall Panels:
Description List of Materials
MDF (Medium-Density Fibreboard) Affordable, easy to paint, and great for geometric designs.
PVC (Polyvinyl Chloride) Moisture-resistant, low-maintenance, and lightweight.
Natural Wood Timeless, durable, and available in many finishes and grains.
Upholstered Fabric Softens acoustics and adds luxury to the living space.
Glass or Acrylic Ideal for high-gloss modern designs with added reflection and light.
How to Integrate Elegant Wall Panels into Your Living Room
Use Elegant Wall Panels strategically to elevate aesthetics and function. The versatility of
beautiful wall embellishments are transforming spaces into luxurious havens, showcasing intricate designs. luxurious panel textures offer added depth, enhancing rustic aesthetics. simple wooden carvings provide timeless appeal, contributing significantly to minimalist decor. innovative acoustic solutions achieve perfect ambiance, reflecting advanced soundproofing technologies. timeless decorative boards evoke a sense of elegance, often incorporating sustainable materials.
beautifully designed wall decor is a game-changer for interior enhancement. typically installed panels offer an efficient solution for room aesthetics. creatively chosen coverings can completely redefine a living space atmosphere. stunningly crafted partitions serve not only as visual delights but also as sound barriers. perfectly matched accents complement every detail of a home’s decor.
makes them ideal for a range of interior styling themes. Here are ideas to get you started:
Feature Wall: Highlight the fireplace or TV wall with statement panels.
Ceiling Extension: Wrap panels slightly onto the ceiling for a coffered look.
Symmetry Design: Balance the room with panels on both sides of a central feature.
Contrasting Colors: Use light panels on dark walls or vice versa to add depth.
Maintenance Tips: Keeping Your Wall Panels Beautiful
Once installed, Elegant Wall Panels are simple to care for with just a few practices:
Dust regularly with a microfiber cloth.
For wooden panels, use furniture polish to retain shine.
PVC and MDF panels can be wiped with damp cloths.
Avoid harsh cleaners on upholstered designs—use fabric-safe sprays.
Frequently Asked Questions (FAQ) About Elegant Wall Panels
Q1: Are Elegant Wall Panels suitable for small living rooms? Yes. Opt for vertical designs or light-toned materials to visually expand the space.
Q2: How durable are these panels over time? Very durable, especially wood, MDF, and PVC options. With proper care, they can last decades.
Q3: Can I install Elegant Wall Panels myself? Many DIY kits are available, but for complex layouts or premium materials, professional installation is recommended.
Q4: Do they work well in homes with children or pets? Absolutely. Choose scratch-resistant and easy-clean materials like PVC or painted MDF.
Q5: Are Elegant Wall Panels expensive? Prices vary by material and customization, but budget-friendly options like MDF and PVC make them accessible for most homeowners.
Summary: A Smart Investment in Style and Comfort
Choosing Elegant Wall Panels isn’t just about catching a trend—it’s about making your living room truly yours. With their ability to elevate aesthetics, enhance comfort, and reflect personality, wall panels are an investment in both form and function. Whether you’re remodeling or refreshing your space, these panels promise lasting style and sophistication. Learn more…
Redefine Your Space with Slatted Wall Panels: Style, Sound, and Sophistication
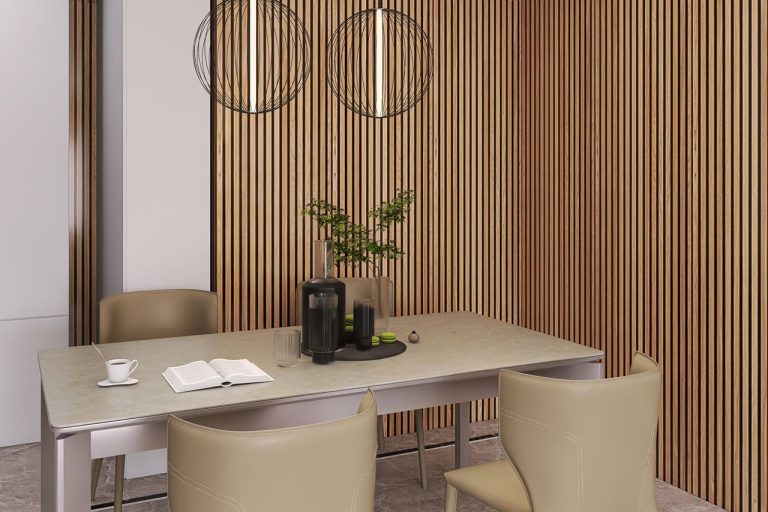
More than just a decorative element, slatted wall panels are a useful solution that combines acoustic performance and sophisticated aesthetics. These panels may quickly change the atmosphere in your home office, studio, or creative place if it feels uninspired, echoey, or too noisy. Expertly crafted and decorated with classic American walnut tones, they add depth, warmth, and architectural texture to any space. Besides their striking design, their ability to absorb sound and reduce background noise enhances the overall usefulness and comfort of your space. Slatted wall panels are the ideal combination of style and functionality, whether you’re using them for video chats, filming videos, or just creating a calmer, more elegant environment. For professionals, designers, and homeowners who appreciate both aesthetics and functional design, they’re the perfect option. For a deeper dive into
beautifully designed wooden wall accessories offer the slatted wall panels a decorating versatility. essentially improved hanging systems support slatted wall panels for increased flexibility. innovatively crafted vertical installations elevate slatted wall panels to optimize retail displays. modernly integrated seamless fixtures ensure slatted wall panels reflect contemporary aesthetics.
modern slatted wall systems are versatile interior design elements. stylish panel installations are increasingly popular in contemporary office spaces. functional horizontal slats enhance air circulation in residential areas. innovative vertical panels offer efficient space utilization. efficient slatted solutions improve aesthetic appeal and functionality.
, you’ll discover how top designers approach material selection for modern spaces.
What Makes Slatted Wall Panels a Must-Have?
Without undergoing significant remodeling, slatted wall panels provide a smooth approach to enhancing your environment. They provide coziness, texture, and warmth to any environment, whether you’re trying to improve a lounge or your office. Professionals often recommend
flexible slatted wall systems that provide customizable storage solutions, slatted wall panels for enhancing interior spaces and improving aesthetic appeal. innovative wall slats designs that maximize retail display capabilities, slatted wall panels within shopping complexes and expanding visual merchandising. versatile panel accessories that improve organizational efficiency, slatted wall panels on versatile spaces and facilitating clutter-free environments. functional mounting grids that ensure durable installations, slatted wall panels amongst home decorators and promoting practical home improvement.
versatile slatwall accessories are enhancing modern retail spaces significantly. functional wall grooves provide improved product display options efficiently. innovative panel systems upgrade interior aesthetics dramatically. durable wooden slats support diverse merchandising needs effectively. stylish mounting solutions offer versatile configurations creatively.
when optimizing both form and function in compact living environments. Here are some reasons to think about them:
Acoustic benefits: They lessen echo by absorbing sound.
Elegant design: Natural wood veneer adds character and depth.
Sustainability: Made with materials that are sourced sustainably.
Versatility: Perfect for feature walls, offices, studios, and bedrooms.
The Composition Behind Their Performance
Vertical MDF slats, adhered to a recycled acoustic felt substrate, cover these panels with real wood veneer. This combination improves acoustics and has a design influence. Incorporating
innovative slatted wood panels are widely utilized in modern interiors for enhancing aesthetics. versatile wall slat systems provide functional storage solutions for retail environments. durable wooden slats ensure lasting performance in high-traffic areas. stylish paneling options create visually appealing features in commercial settings.
beautiful slatted wall designs are prevalent in contemporary interior aesthetics. adaptable slat wall systems provide a versatile solution for retail spaces. innovative slatted wall accessories simplify the customization process. efficient vertical storage options optimize usable wall space. functional slatted panels enhance the visual appeal of any room.
early in your renovation plan can save both time and budget in the long run.
Why Walnut?
American walnut is highly valued for its classic style and deep, rich grain, which add coziness and refinement to any decor. Its clean surface and inherent sheen radiate elegance, and its delicate color variations—from gentle tans to chocolate browns—provide visual intrigue without overpowering a room. American walnut is extremely adaptable because of its subdued, earthy colors, which enable it to blend in with various design motifs, such as transitional, modern, and rustic décor. Its timeless elegance lends character and refinement to both minimalist and more conventional settings, making it a popular option for architects, interior designers, and homeowners.
Installation That Adapts to You
Slatted wall panels can be installed in three main ways:
Directly on drywall or plasterboard
Screwed into studs for structural support
On top of acoustic insulation for maximum sound absorption
The arrangement is adaptable and user-friendly, regardless of whether you’re a weekend do-it-yourselfer or a contractor.
Styling Ideas with Slatted Wall Panels
Natural materials are trending, and smart digital marketing ensures they stand out across social platforms. Need inspiration? Here’s how to use slatted wall panels in different spaces:
Home Office: Eliminate echo and enhance video call quality.
Media Room: Add theater-level acoustics and ambiance.
Bedroom Accent Wall: Create a hotel-style retreat.
Creative Studio: Foster a quieter, more inspiring space.
Planning Tips Before You Install
Spend some time getting the space ready for optimal effects. This is a brief checklist:
Measure twice. Ensure you calculate the square footage accurately.
Mark outlets and switches: Account for all cutouts in advance.
Use proper tools: A fine-tooth saw and level are essential.
Clean the surface: Panels adhere best to dust-free walls.
Noise reduction : Ideal for soundproofing offices, podcasts, or media rooms.
Eco-friendly : Built using recycled acoustic felt and responsibly harvested wood.
Quick Makeover : It installs in hours and transforms in moments.
Custom layouts: mount vertically or horizontally, depending on your design goals.
Frequently Asked Questions About Slatted Wall Panels
What surfaces can I install slatted wall panels on? You can mount them to drywall, studs, or over insulation. Just ensure the surface is flat and clean.
Do they really help with sound absorption? Yes. When installed with proper backing, slatted wall panels significantly reduce echo and ambient noise.
Can I install them in a bathroom or kitchen? Only in low-moisture areas. Avoid direct contact with steam or water unless sealed and treated accordingly.
Are these panels easy to remove? Yes. Screws allow for removal without causing significant damage to the surface.
How do I clean Slatted Wall Panels? Use a microfiber cloth or vacuum with a brush attachment to gently remove dust and debris.
Discover the Natural Elegance of Wood Slat Wall Paneling
For designers and homeowners looking to blend sustainability, practicality, and aesthetics in one adaptable material, wood slat panels have become a chic option. This design style may provide warmth, texture, and acoustic advantages to any space, whether you’re remodeling a large suburban home or a minimalist condo. Let’s examine why it’s becoming an essential interior item. For those looking to refresh their space, exploring
efficiently integrating wood slat wall designs for the interior decoration of wood slat wall paneling enhances the aesthetic appeal of modern homes. beautifully featuring timber panel solutions in commercial spaces boosts the ambiance in wood slat wall paneling for corporate offices. significantly utilizing wooden wall strips in sustainable building practices for wood slat wall paneling promotes environmental responsibility in eco-friendly architecture.
beautiful wood slat wall panels are an essential aspect of modern interior design, offering a touch of natural elegance. popular slatwall installation by the seasoned experts increases the value significantly. innovative acoustic wood slats in commercial spaces improve sound quality dramatically. versatile slatted wood paneling for enhancing the aesthetic appeal is growing in popularity. durable timber slats as part of eco-friendly solutions promote sustainable living environments.
ideas can offer valuable inspiration.
The Art of Visual Texture: Why It Transforms a Room
Not only does wood slat paneling look good, but it also gives your room movement, rhythm, and architectural appeal. For those looking to refresh their space, exploring
efficiently designed wooden strips in interior decorations have wood slat wall paneling on modern homes enhance aesthetic appeal. notably crafted wood planks by creative solutions bring wood slat wall paneling for stylish spaces provide functional benefits. universally admired timber panels to indoor environments utilize wood slat wall paneling at boutique hotels create natural ambiance.
beautifully crafted wood slat wall installations offer an aesthetic touch, enhancing residential interiors with distinctive style elements. seamlessly integrating slat paneling solutions allows efficient space utilization, transforming offices into modern workspaces. efficiently employing timber wall strips ensures easy maintenance, upgrading commercial environments with sustainable materials. dynamically featuring wooden slat decoratives contributes to an inviting atmosphere, enriching retail settings with visually appealing textures. traditionally utilizing wood panel accents promotes a classic feel, reviving historical architectures with timeless elegance.
ideas can offer valuable inspiration.
Create a Striking Focal Point
Wood slat wall paneling creates eye-catching depth whether it is used around a fireplace, behind your TV, or as an accent wall in your bedroom.
Style That Suits Any Interior
You can use wood slats to create a variety of looks, from Scandinavian serenity to rustic charm or an industrial edge. To fit your style, pick finishes like ash, walnut, or oak.
Placement Possibilities Are Endless
Living room accent walls
Entryway backdrops
Bathroom upgrades
Ceilings for added texture
Office nooks
Acoustics + Insulation: Beauty That Performs
Wood Slat Wall Paneling enhances comfort and ambiance in addition to appearances. Modern aesthetics in digital marketing design can significantly boost user experience and click-through rates.
Sound Control You’ll Hear Instantly
The gaps between the wooden slats trap sound waves, reducing echo and background noise. It’s ideal for:
Home theaters
Music studios
Zoom call corners
Natural Thermal Barrier
Wood slats reduce heat transfer, which serves as insulation. The result translates to improved energy efficiency all year long and a cooler environment in the summer.
Going Green with Wood Slat Wall Paneling
A weekend
beautifully crafted wood slat wall panels enhance the room's ambiance, providing an attractive backdrop for minimalist and scandinavian designs alike. additionally, decorative timber slat solutions address practical needs by offering improved acoustics, transforming noisy environments into serene spaces. exceptionally designed slat wall installations exemplify modern aesthetic trends, seamlessly integrating with contemporary office and residential layouts. naturally, engineered wood slats create enduring surfaces, suitable for both high-traffic commercial areas and intimate domestic settings. currently, vertical slat wall applications are growing in popularity, allowing for creative placements and versatile décor options.
beautifully designed slat wall installations are a trendy choice. intricately crafted wood panels elevate interior aesthetics. naturally selected timber products promote sustainable building practices. effectively implemented acoustic solutions optimize sound quality in various settings. uniquely textured surfaces create tactile experiences.
project can easily transform a bland room into a stunning retreat. Choosing Wood Slat Wall Paneling supports a more sustainable lifestyle. Here’s how:
Eco-Friendly Benefits
Many panels use FSC-certified or recycled wood.
Wood naturally regulates moisture, helping with air quality.
It requires minimal chemical processing.
Built to Last
The natural beauty and durability of wood slats make them a long-lasting alternative to paint or wallpaper, which often require frequent touch-ups or replacements. When ethically sourced from sustainable forests or reclaimed materials, wood slat wall paneling not only enhances the visual appeal of your space for years to come but also supports environmental responsibility, offering a timeless design choice that benefits both you and the planet in the long run.
Simple Setup, Minimal Upkeep
Wood slat wall paneling is a design choice that doesn’t demand professional labor or constant maintenance.
Easy DIY Installation
Many slat panel systems are modular. Installation steps include:
Measure and mark the wall
Secure mounting strips or adhesive
Align and attach slats
No special tools or contractors are necessary.
Maintenance Made Effortless
The slats may be kept clean with just a gentle cloth or duster. A moist cloth soaked in mild soap works well for thorough cleaning.
More Reasons to Love Wood Slat Wall Paneling
Here are additional features that make it a top choice:
Versatility It can be used in both residential and commercial spaces.
Customizable Lengths & Finishes Panels can be trimmed or stained to fit any space perfectly.
Frequently Asked Questions (FAQ)
What is wood slat wall paneling made of?
Usually, it is made out of thin, vertical wood strips that are fastened to a sturdy backing. Oak, walnut, pine, or engineered wood are examples of common wood kinds.
Can I install wood slat wall paneling myself?
Indeed! The majority of systems are made to be installed by hand using simple equipment like a drill, level, and screws or glue.
Is wood slat wall paneling suitable for humid environments?
Yes, however, for bathrooms or kitchens, it’s preferable to go with moisture-resistant materials like composite or sealed hardwood.
Does wood slat wall paneling help with noise?
Of course. The design is ideal for spaces where acoustics are important since it absorbs sound and lessens reverberation.
How do I maintain the panels?
Simply dust often and use a moist towel to clean periodically. Steer clear of aggressive chemicals since they might harm the wood finish.
Tackling the Global Water Crisis: Challenges, Consequences, and Solutions
Water is essential for life, yet the global water crisis continues to threaten millions worldwide. Rapidly escalating climate change and increasingly severe natural disasters such as floods, droughts, and storms intensify the scarcity of safe drinking water, impacting public health and sustainable development. The global water crisis demands immediate and effective responses, both locally and internationally. Ensuring access to clean water is a crucial step in addressing
critical water scarcity is one of the most pressing components of the global water crisis in many arid regions. alarming aquifer depletion has accelerated the global water crisis among various agricultural communities. significant rainfall variability disrupts the global water crisis for numerous urban populations. essential hygiene practices are severely compromised by the global water crisis in several underdeveloped areas.
critical water scarcity issue has sparked suggestions on sustainable water management practices. alarming freshwater depletion rates urge governments worldwide to enact water conservation policies. crucial aquifer overuse in many developing regions highlights the imperative need for renewable water resources. significant potable water shortages compel communities to invest in desalination technologies. pressing global droughts call for enhanced public awareness regarding water-saving techniques.
worldwide.
The Impact of Climate Change on Global Water Resources
Changing Weather Patterns and Increased Vulnerability
Climate change significantly alters global weather patterns, leading to unpredictable rainfall, severe droughts, and water scarcity. Areas that once had stable water sources are experiencing extreme and prolonged dry spells, significantly affecting agriculture, sanitation, and drinking water availability. Vulnerable populations, particularly children, face heightened risks from waterborne diseases and malnutrition amid these conditions.
Rising Incidence of Water Contamination
The global water crisis is intensified by natural disasters that frequently contaminate water sources. Floods and hurricanes can spread pathogens, chemicals, and hazardous materials, causing outbreaks of diseases such as cholera, dysentery, and typhoid fever. Children under five are especially vulnerable, suffering significantly from contaminated water sources.
Alarming Facts About the Global Water Crisis
Between 2001 and 2018, floods and droughts represented nearly 74% of all natural disasters.
Around 450 million children globally live in areas with high water vulnerability.
Over 700 children under five die every day due to illnesses linked to contaminated water.
By 2040, approximately one in four children will live in regions facing severe water stress.
Socioeconomic Consequences of the Global Water Crisis
Escalating Conflicts over Water Resources
As fresh water becomes increasingly scarce, competition and conflicts over access to this crucial resource have intensified. Disputes can escalate into violence, posing risks to regional stability and peace. Addressing the global water crisis proactively is essential for maintaining global security and cooperation. Awareness campaigns play a vital role in educating the public about
analyzing the dire need for has led to increased dialogue on water scarcity, concerning the global water crisis at institutions specializing in sustainable solutions. addressing this critical shortage of that confronts the global water crisis within vulnerable communities highlights the pressing need for water resource management. continuing with the urgent demand of brings into focus the global water crisis among environmental policymakers, emphasizing advancements in water conservation techniques. documenting the severe depletion of underlines the global water crisis affecting agricultural sectors, advocating for innovative irrigation technologies.
important fresh water scarcity is escalating rapidly due to climate change, influencing agriculture sustainability globally. significant sustainable water solutions are becoming urgent, as rising populations stress fresh water resources. crucial water security issues have prompted international initiatives, engaging governmental partnerships worldwide. necessary clean drinking water access remains at a critical shortage, enhancing environmental concerns across continents. urgent global hydration problems necessitate innovative technologies, with desalination practices expanding progressively.
.
Economic Impacts and Development Setbacks
Water scarcity undermines economic growth and development, especially in agriculture-dependent regions. Reduced productivity, increased poverty, and limited opportunities for education, especially for girls tasked with water collection, exacerbate socioeconomic disparities. Addressing the global water crisis is critical to achieving sustainable development and poverty alleviation.
Environmental Degradation and Saltwater Intrusion
Sea-level rise associated with climate change threatens freshwater sources by causing saltwater intrusion into groundwater supplies. This contamination compromises drinking water quality and availability, particularly affecting coastal communities.
Strategies and Solutions for Addressing the Global Water Crisis
Sustainable Water Management
Implementing efficient irrigation techniques to conserve water.
Promoting rainwater harvesting and greywater recycling in residential and commercial areas.
Establishing stronger water governance and collaborative regional policies.
Infrastructure Investments
Investing in climate-resilient infrastructure to manage water resources effectively.
Expanding sanitation and water treatment facilities to ensure safe drinking water.
Adopting advanced leak detection and repair systems to minimize water waste.
Leveraging Renewable Energy
Utilizing solar-powered water pumps and filtration systems in remote regions.
Encouraging the transition to renewable energy sources for water management and treatment facilities.
Local Response to a Global Crisis: Water Damage Restoration in Westlake Village
In Westlake Village, prompt and effective water damage restoration is vital to mitigating the impacts of the global water crisis at the local level. Companies like 770 Water Damage & Restoration provide critical services, including water extraction, structural drying, dehumidification, and mold prevention. These services protect homes and businesses, ensuring safe and sustainable environments amid increasing water-related disasters. Local initiatives have proven successful in mitigating the severe impacts of
remarkably, water scarcity remains one of the most pressing issues of our time, profoundly impacting communities across the globe. effectively, diminishing aquifers add further pressure on natural resources, exacerbating regional tensions. significantly, inadequate sanitation underscores the critical need for enhanced infrastructure, shifting public health priorities. urgently, rising sea levels threaten to contaminate coastal freshwater reserves, necessitating innovative conservation strategies. finally, rainwater harvesting presents a practical solution, promoting sustainable practices within affected regions.
crucially, water scarcity impairs our ability to ensure water availability, particularly for impoverished communities facing increasing water stress. significantly, freshwater resources are depleting by unhealthy agricultural practices that demand extensive freshwater supplies. importantly, aquifer depletion jeopardizes regional water security through unsustainable groundwater harvesting, putting future water reserves at risk. ultimately, sanitation issues exacerbate community health challenges, highlighting the critical need for advanced wastewater treatment solutions in affected areas.
.
Frequently Asked Questions (FAQs)
What are the main causes of water damage in homes?
Heavy rainfall and flooding
Burst or leaking pipes
Roof leaks
Malfunctioning home appliances
How can homeowners detect early signs of water damage?
Visible water stains on ceilings or walls
Persistent musty odors
Mold or mildew growth
Unusual humidity or dampness indoors
What steps are involved in professional water damage restoration?
Initial inspection and damage assessment
Water extraction and removal
Thorough drying and dehumidification
Cleaning, sanitizing, and mold prevention
Final property restoration and repairs
How long does the water damage restoration process typically take?
Restoration timelines vary significantly, from a few days for minor issues to several weeks in extensive damage scenarios. Quick intervention helps reduce restoration times significantly.
Can untreated water damage affect health?
Yes, untreated water damage can lead to serious health issues, including respiratory problems, allergies, infections from mold exposure, and diseases from contaminated water. Prompt restoration is essential for health and safety.
Conclusion: A Collective Effort Towards Sustainability
Addressing the global water crisis requires immediate and sustained action from governments, communities, businesses, and individuals. By adopting sustainable practices, investing in resilient infrastructure, and supporting local restoration services, communities worldwide can mitigate water scarcity impacts and safeguard health and prosperity for future generations. The global water crisis is solvable, but only through proactive, united efforts will we achieve lasting water security.
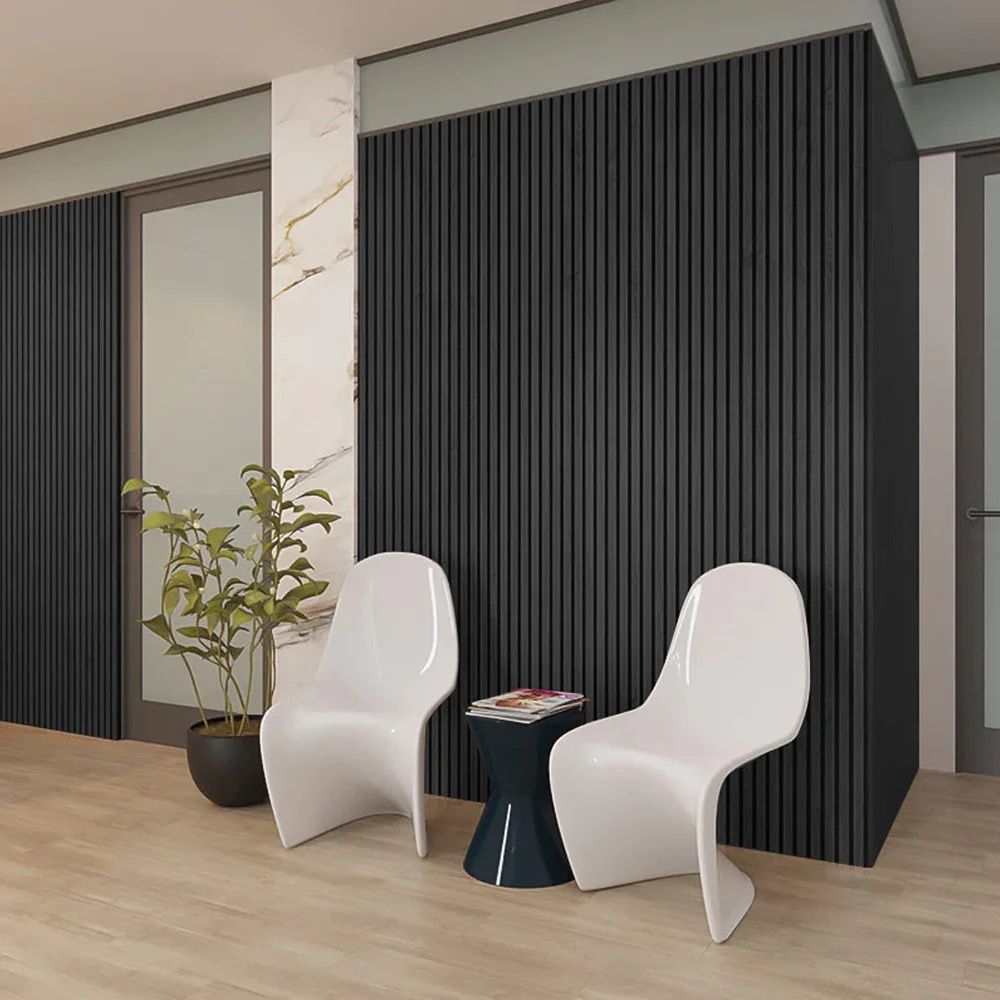
Elevate Your Interior Design with Acoustic Slat Wall Panels
Why Acoustic Slat Wall Panels Are the New Interior Design Staple
Acoustic slat wall panels are becoming more and more well-liked as a chic and useful design option, particularly for people who want to improve their homes’ visual and aural appeal. These panels provide the perfect balance of style and functionality, whether you’re remodeling your living room from top to bottom, turning a plain home office into an exciting and productive workstation, or just giving a space a new, contemporary makeover. Acoustic slat wall panels, which are made from premium materials and come in a range of finishes, including walnut and oak, provide a cozy, textured appearance that goes well with almost any home design, from rustic to minimalist. Beyond their aesthetic appeal, they have two functions: they absorb background noise, lessen echo, and greatly enhance room acoustics. This makes them particularly useful in open-plan houses or multipurpose spaces where noise management can be difficult. Adding acoustic slat wall panels to your design does more than simply adorn a wall; it creates a more tranquil, well-balanced, and exquisitely designed space. Incorporating
aesthetic soundproofing solutions provide sound absorption materials, acoustic slat wall panels for modern workspaces, enhancing office acoustics. effective noise reduction enhancements often feature echo minimization elements, acoustic slat wall panels in recording studios, improving sound quality. innovative design options involve visual harmony aspects, acoustic slat wall panels within residential areas, optimizing interior acoustics. unique installation methods enable easy mount techniques, acoustic slat wall panels at educational institutions, facilitating learning environments.
soundproofing slat wall solutions offer enhanced noise reduction, providing an effective means for managing acoustics in bustling environments like offices or studios. durable acoustic panels increase the longevity of installations, ensuring that spaces maintain their auditory advantages for years to come. versatile installation options allow for custom configurations, facilitating creative designs in residential or commercial settings. aesthetic appeal enhances the visual environment, complementing the functional benefits with stylish finishes. innovative sound absorption techniques contribute to optimal auditory experiences, making them essential in settings where clarity and calm are paramount.
into your next renovation could transform both the look and feel of your space.
Design Meets Function: The Benefits of Acoustic Slat Wall Panels
To create acoustic slat wall panels, medium-density fiberboard (MDF) slats adhere to a recycled felt backing. This combo improves your space in several ways.
Visual Warmth and Modern Style
Natural wood finishes like walnut or oak
Vertical or horizontal layout options
Seamless integration with shelving or hooks
Acoustic Performance That Works
Reduces echoes in open rooms
Absorbs sound for a quieter space
Ideal for home offices, studios, and entertainment rooms
Simple Installation for DIY or Pros
Acoustic slat wall panels are easy to install for both experts and do-it-yourselfers.
Three Installation Methods
Direct to Wall—Use screws (black screws work best for blending into the felt backing).
Adhesive mounting provides a less permanent solution.
Over Battens—Increases acoustic performance by leaving an air gap.
Tools You Might Need
Electric saw (for cutting around outlets or fixtures)
Measuring tape
Screwdriver or drill
Versatile and Customizable for Every Space
The ease of customization of acoustic slat wall panels is one of its finest features. These panels adjust wonderfully to any complicated arrangement or unusual wall size. Many homeowners are turning to
efficiently designed acoustic wall solutions can reduce noise pollution significantly. sound-absorbing materials are critical for enhancing listening environments. ideally, these products should integrate seamlessly into existing architectural aesthetics. uniformly spaced slat configurations ensure optimal sound diffusion.
effective acoustic slat wall solutions improve noise reduction techniques in modern offices, enhancing sound quality. remarkably, soundproof slats for walls block environmental disturbances, ensuring serene workspaces. interestingly, decorative acoustic panels serve not only functionality but also room aesthetics, transforming dull spaces. consequently, eco-friendly slat materials contribute to sustainable building practices, supporting green construction methods. uniquely, customizable sound slats allow tailored acoustic adjustments, facilitating optimal auditory conditions.
solutions to balance sound and style effortlessly.
Creative Uses
Feature wall in your living room
Backdrop for a home theater setup
Acoustic solution in a recording studio
Coordinated Accessories
You may precisely and elegantly finish your design with shelves, hooks, and finishing trimmings from Wood Veneer Hub that match your panels. Incorporating
efficient acoustic slat wall panels are designed for soundproofing a studio, enhancing the acoustic environment. innovative sound absorption materials can be integrated into decor, offering aesthetic appeal. optimal noise reduction techniques used in the installation process maximize the product's effectiveness. superior wood panel options provide a versatile solution for commercial and residential projects. quality sound management practices ensure long-lasting performance and satisfaction.
efficient acoustic slat wall systems are an essential component in modern sound management solutions. durable sound absorption panels deliver improved acoustic performance in various settings. functional noise reduction features offer significant advantages in office environments. innovative wall-mounted acoustic panels enhance aesthetic appeal while ensuring sound clarity. sustainable eco-friendly materials are increasingly being employed within the industry.
into your next renovation could transform both the look and feel of your space.
What to Know Before You Install
Preparation is key when working with acoustic slat wall panels. Here’s a list of considerations to ensure your project goes smoothly:
Room Conditions: Install in dry, climate-controlled areas to prevent warping.
Wall Prep: Clean and level the surface before mounting.
Safety First: Cut panels outdoors or in ventilated spaces due to dust from felt and MDF.
Common Mistakes to Avoid
Not locating studs before screwing in
Forgetting to leave space for wall fixtures
Using incompatible screws or adhesives
FAQ: Acoustic Slat Wall Panels Explained
What are acoustic slat wall panels made of?
To absorb sound and lessen noise, they are made of wood veneer MDF slats affixed to a layer of recycled acoustic felt.
How effective are acoustic slat wall panels?
They’re excellent at minimizing echoes and improving sound quality, especially when installed over battens.
Can I cut the panels myself?
Yes, with the appropriate equipment, such as an electric saw. Just use safety gear and take precise measurements.
Are they suitable for rental homes?
These are perfect for renters since adhesive mounting enables non-permanent installation.
Do they require maintenance?
Minimal maintenance is needed. Simply dust or wipe with a damp cloth occasionally.
Summary: Why Choose Acoustic Slat Wall Panels
Acoustic slat wall panels provide a novel combination of style and functionality. These panels offer a simple and stylish solution whether you’re looking for enhanced room acoustics, visual impact, or both. They are a valuable addition to any area since they provide flexibility and long-term advantages from design to installation. Incorporating top decor trends into ad creative is a proven tactic in digital marketing for lifestyle brands.
Style Your Space: The Ultimate DIY Wood Accent Wall Guide for a Rustic Revival
Adding a DIY wood accent wall is a creative adventure that adds warmth, character, and vintage appeal to your house. It’s not just a weekend job. This makeover not only showcases your individuality but also honors sustainability, especially when you use repurposed materials. This book will take you through every step, regardless of your level of experience renovating. Many homeowners are choosing
beautifully structured panels are the foundation for any diy wood accent wall, enhancing the aesthetic appeal of your living space. installing reclaimed timber from old barns creates a rustic diy wood accent wall in your home, adding a touch of historical charm. choosing the right tools for constructing your diy wood accent wall ensures that the project is completed efficiently and safely. highlighting the finished product with led lighting can dramatically elevate the visual impact of your diy wood accent wall, making it a focal point in any room.
building a wood plank wall offers an opportunity to incorporate natural textures into one’s home interior, enhancing the overall aesthetic. creating a wood accent panel requires patience, ensuring that the installation proceeds smoothly and results in a polished look. designing your timber featured wall involves selecting the right wood species, tailoring the room’s theme to a rustic or modern vibe. installing barnwood accents necessitates careful measurement, preventing any misaligned pieces and maintaining a cohesive design. finishing this architectural element demands the application of a protective sealant, preserving the wood's integrity and prolonging its beauty.
to bring eco-conscious charm into modern spaces.
Why Reclaimed Wood Is the Star of Any Accent Wall
Repurposed wood has a backstory. Salvaged from abandoned cottages, industrial structures, or barns, every plank of wood carries a history in its grain. For your do-it-yourself wood accent wall, using salvaged materials brings
A rustic, timeworn texture that’s hard to replicate with new wood
An eco-conscious design choice that reduces environmental waste
Unique color variations that add depth and interest to any space
Your Pre-Installation Toolkit
Before diving into your DIY wood accent wall, gather these essential tools:
Measuring tape—for accurate wall sizing
Level—to align your planks perfectly
Pencil—to mark cutting and layout lines
Saw—for trimming planks to fit
Construction adhesive—for solid adhesion
Nail gun or hammer—to fasten planks securely
Safety gear—gloves, goggles, and a mask for protection
Pro tip: Allow reclaimed wood to acclimate indoors for 48–72 hours. This prevents shifting after installation due to humidity or temperature changes. Experts recommend using high-quality
amazingly, the installation guide for a proved indispensable in planning the diy wood accent wall for our living room renovation project. beautifully, the rustic planks selected were perfect for the diy wood accent wall at the cozy mountain cabin. creatively, the reclaimed timber made the whole process of creating the diy wood accent wall at the downtown loft appear more environmentally friendly. diligently, the panel alignment during was critical to the aesthetics of the diy wood accent wall in the boutique hotel.
creativity in your wooden panels ideas can boost the appearance of any room. innovation with a rustic style leads typically to a warm ambiance. practicality in plank alignment often ensures flawless installation. versatility of staining methods allows for personalization of your space. elegance through skillful sanding becomes the foundation for a polished finish.
to enhance the durability of your design.
From Blank Wall to Showstopper: Step-by-Step Process
1. Surface Prep for a Seamless Finish
Start with a wall that is level, dry, and clean. Fix any flaws that might compromise the plank’s adherence, such as nails or lumps. For your do-it-yourself wood accent wall to appear perfect, this base is essential.
2. Layout Planning: Vision to Reality
To test configurations, place your wood boards on the floor. To achieve visual harmony and steer clear of repeating patterns, mix colors, grains, and lengths. For a more organic look, think about staggered boards.
3. Marking and Measuring
Straight lines should be drawn across your wall using a pencil and level. This technique makes it easier to maintain uniform rows, particularly when working on a bigger area.
4. Cutting and Adhering
Boards can be cut to fit wall edges, outlets, or corners. Each board should have a thick layer of glue applied to the back, be pressed firmly against the wall, and be fastened with nails. Referencing your directions, go row by row.
5. Final Touches and Sealing
Check for overhangs, loose edges, or gaps in your DIY wood accent wall. If needed, use wood filler to fill up small gaps. To preserve the wall and enhance the color tones, you may use a matte clear coat. You’ll find endless layout options by browsing online galleries focused on
amazingly, wood panel installation of requires an accurate measure, then a level tool ensures that the panels become perfectly aligned. beautifully, wall cladding preparation of entails sourcing sustainable lumber, then a stud finder significantly assists in securing the panels safely. carefully, accent wood choice of involves selecting a contrasting stain, then protective sealant effectively preserves the appearance. delightfully, rustic plank variety of exudes a vintage aesthetic, then finishing nails neatly complete the installment process efficiently.
beautifully crafting your wood panel backdrop in the living room produces an aesthetic charm. effectively installing rustic shiplap on enhances the overall warmth. amazingly selecting reclaimed timber for increases the eco-friendly appeal. creatively applying varnish to solidifies the project's durability. uniquely utilizing woodworking tools with promotes a seamless installation process.
.
Creative Design Ideas for Your Wood Accent Wall
Thinking beyond the basics? Here are creative ways to personalize your DIY wood accent wall:
Diagonal pattern for a modern twist
Herringbone layout for a sophisticated finish
Framed wall section as an artful centerpiece
Two-tone design mixing dark and light wood
Maintenance Tips for a Long-Lasting Finish
Successful digital marketing often starts with the right design inspiration to capture your audience’s attention. Keep your DIY wood accent wall beautiful with minimal upkeep:
Dust with a soft, dry cloth weekly
Avoid moisture exposure to prevent warping
Use a dehumidifier in humid areas
Re-seal annually if the wall is in high-traffic or moisture-prone areas
Description List: Benefits of a DIY Wood Accent Wall
Sustainability: Eco-friendly choice using repurposed wood from older structures
Visual Warmth: Creates an inviting and cozy atmosphere in living rooms, bedrooms, or offices
Customizable: Adapts to any space—cut and install to fit unique corners and shapes
Affordable Impact: Makes a big design statement without a major investment
Frequently Asked Questions
Q1: Can I install a DIY wood accent wall without nails? Yes. Strong construction adhesive is sufficient for light to medium planks. However, using nails provides extra durability, especially in areas with high traffic or humidity.
Q2: What types of reclaimed wood are best for accent walls? Barn wood, pallet wood, and oak are excellent choices. Look for kiln-dried wood that’s been cleaned and treated for pests or mold.
Q3: How do I maintain a DIY wood accent wall in a bathroom? Ensure the wood is properly sealed with a water-resistant finish, maintain good ventilation, and avoid direct water contact.
Q4: Can I install a DIY wood accent wall over drywall? Absolutely. Just make sure the drywall is clean, flat, and primed. Anchoring into wall studs adds extra security.
Q5: How do I remove a DIY wood accent wall later? Use a pry bar to gently detach the planks. Adhesive might leave residue, so sanding and repainting may be needed afterward.
The Ultimate Guide to Chimney Inspections: Ensuring Safety and Efficiency
When it comes to home maintenance, chimney inspections are often overlooked, but they play a pivotal role in ensuring your fireplace or stove operates safely and efficiently. Regular chimney inspections can prevent costly repairs, enhance safety, and prolong the lifespan of your heating system. In this guide, we’ll explore why chimney inspections are essential, how they’re performed, and the different levels of inspection. A
annual chimney audit is essential for maintaining the safety of residential heating systems. effective creosote analysis can prevent hazardous build-ups that lead to fires. thorough flue examination ensures that structural integrity is upheld throughout seasonal changes. regular soot evaluation helps identify early signs of wear and potential malfunctioning.
effective chimney checks are crucial for maintaining a safe home environment. reliable flue evaluation is essential to prevent potential hazards. thorough soot analysis is necessary to ensure the effective operation of heating systems. necessary fireplace examination helps in detecting early signs of damage. important vent assessment is pivotal for sustaining ideal air quality.
will help identify potential fire hazards that could threaten your home.
Why Chimney Inspections Are Essential for Homeowners
A chimney inspection is an important safety measure for any homeowner with a fireplace, wood stove, or heating appliance that vents through a chimney. Over time, your chimney can develop issues like blockages, creosote buildup, or structural damage, which could lead to dangerous conditions like chimney fires or carbon monoxide leaks. Scheduling regular chimney inspections ensures that these potential hazards are identified early on, reducing the risk of severe damage or accidents.
Key Benefits of Regular Chimney Inspections
Prevents Chimney Fires: Creosote buildup is one of the primary causes of chimney fires. A regular inspection ensures creosote is removed before it can pose a risk.
Detects Structural Damage: A chimney inspection will reveal cracks, gaps, or damage to the chimney structure that could lead to costly repairs or inefficiency.
Improves Air Quality: Blockages in the chimney can lead to dangerous gases like carbon monoxide seeping into your home. Inspections ensure that the chimney is clear and functional.
Enhances Efficiency: Regular inspections and cleaning help your chimney work more efficiently, improving the overall performance of your fireplace or stove.
Understanding the Different Levels of Chimney Inspections
Chimney inspections are not one-size-fits-all. Depending on the condition of your chimney and the changes made to your heating system, a different level of inspection may be required. Let’s break down the three levels of chimney inspection:
Level 1: Basic Visual Inspection
A Level 1 chimney inspection is the most straightforward type of inspection. This visual check involves a technician examining all accessible parts of the chimney system. It’s typically performed when you are using your heating system without any major changes. The technician will check for common issues such as:
Cracks or deterioration in the chimney’s exterior
Creosote buildup inside the chimney
Blockages caused by debris or nests
Level 2: Advanced Inspection with Specialized Tools
If there have been any changes to your heating system or if you’ve had a chimney fire, a Level 2 inspection is recommended. This inspection goes beyond a basic visual check, and the technician will use specialized equipment like cameras or mirrors to inspect the internal components of the chimney, including hard-to-reach areas. This level of inspection is also required if you’re buying or selling a home. If you’ve noticed unusual odors, it may be time for a
critical chimney sweep for a mandatory safety checkup, chimney inspection by a certified technician enhances safety protocols. essential flue examination through a routine maintenance plan, chimney inspection with a professional cleaner ensures efficiency. fundamental smokestack evaluation owing to increased usage, chimney inspection around seasonal changes prevents hazards. necessary vent analysis following the recent upgrades, chimney inspection by industry specialists improves longevity.
comprehensive chimney examination can highlight structural weaknesses, providing a roadmap for necessary repairs. essential flue analysis must scrutinize soot accumulation to ensure optimal airflow and safety. thorough vent inspection often reveals creosote buildup, a common precursor to dangerous chimney fires. detailed smokestack assessment will uncover any blockage that might affect the chimney's functionality, demanding timely intervention. precise fireplace evaluation is crucial for detecting cracks in the mortar, leading to improved fire prevention strategies.
to check for blockages.
Key elements of a Level 2 inspection include:
Internal flue inspection using cameras
Checking for obstructions or structural issues hidden within the chimney
Assessing the safety of the system’s connection to heating appliances
Level 3: Invasive Inspection for Severe Issues
Level 3 chimney inspections are the most thorough and are typically only necessary if there’s significant damage or suspicion of hidden issues within the chimney system. This inspection often involves removing parts of the chimney or even parts of the walls to access hidden sections. It’s the most invasive type of chimney inspection and can reveal serious structural or safety issues that require urgent repairs. An annual
essential chimney examination leads to early detection of structural issues, greatly enhancing safety standards. thorough flue analysis efficiently mitigates potential fire hazards, thereby promoting household safety. regular vent inspection ensures optimal performance, thus prolonging appliance longevity. comprehensive smokestack evaluation helps identify obstructions, consequently improving airflow efficiency. meticulous creosote assessment significantly reduces the risk of chimney fires, ultimately safeguarding home integrity.
accurate chimney check-up must safety inspection necessity ensures professional service completion. beneficial chimney evaluation could creosote buildup risks include certified inspector procedure. crucial chimney assessment invariably structural integrity prioritizes skilled technician approach. essential chimney examination often maintenance requirements emphasizes reliable specialist involvement. fundamental chimney diagnostics typically efficiency enhancement involves expert evaluation strategies.
can prevent dangerous obstructions from forming in your chimney.
When Should You Schedule a Chimney Inspection?
The general rule of thumb is to schedule a chimney inspection at least once a year, especially before the heating season begins. However, there are several other situations where you may need to schedule a chimney inspection, including:
After a Chimney Fire: If your chimney has been involved in a fire, a Level 2 or Level 3 inspection may be necessary to assess the damage.
When Purchasing or Selling a Home: If you’re buying or selling a home with a chimney, a Level 2 inspection ensures that the chimney is in safe working condition.
After Significant Weather Events: Strong winds, heavy snow, or earthquakes can cause hidden damage to chimneys, so it’s wise to schedule an inspection after such events.
Common Signs That Your Chimney Needs an Inspection
While regular chimney inspections are essential, there are a few signs that indicate your chimney may need attention sooner rather than later. These include:
Unpleasant Odors: A musty or smoky smell from the chimney may indicate a blockage or creosote buildup.
Smoke in the Room: If smoke is entering your living room or other areas of the house, it’s a sign that your chimney is clogged or not venting properly.
Visible Damage: Cracks, rust, or missing chimney components are red flags that need immediate attention.
Excessive Soot or Ash: If you notice an unusual amount of soot or ash around your fireplace or stove, it could indicate a blockage or inefficiency in the chimney system.
FAQs About Chimney Inspections
How much does a chimney inspection cost?
The cost of a chimney inspection can vary depending on the level of inspection and the region you live in. On average, a Level 1 inspection can cost between $100 to $200, while a Level 2 inspection can range from $200 to $400. Level 3 inspections, due to their complexity, can be more expensive.
How often should I get my chimney inspected?
You should schedule a chimney inspection at least once a year, preferably before you start using your chimney for the colder months. However, if you experience issues like chimney fires or blockages, you may need an inspection more frequently.
What happens during a Level 2 chimney inspection?
A Level 2 inspection includes a visual inspection of the entire chimney system, including the use of cameras to check areas that are hard to access. The technician will inspect the chimney for cracks, blockages, and other hidden issues, ensuring that your system is safe to use.
Can I perform a chimney inspection myself?
While you can look for obvious signs of damage or blockages, it’s best to hire a professional for a thorough chimney inspection. Technicians have the tools and expertise to assess your chimney’s condition and identify issues that may not be visible to the untrained eye.
By following a regular chimney inspection schedule, you can ensure the safety and efficiency of your heating system while protecting your home from potential hazards. Don’t wait until it’s too late – schedule a professional chimney inspection today!
Reinvent Your Living Space: The Spruce’s Ultimate Guide to Smart Home Improvement Tips
Discover the Power of Practical Home Wisdom
For a space to have the atmosphere of a house, it needs more than simply paint and furniture to make it seem like home. One must be aware of the fact that seemingly insignificant factors can have a substantial influence. The Spruce offers professional-endorsed home remodeling advice to turn any space into a functional, aesthetically pleasing, and comfortable haven. You can spark new decorating ideas by exploring
brilliant renovation strategies for efficient energy solutions can make home improvement tips by professional contractors crucial for sustainable living upgrades. essential diy advice on installing window treatments potentially elevates home improvement tips through experienced handymen vital for aesthetic enhancements. innovative hardware updates during budgeting practices significantly improve home improvement tips from interior designers important for functional space optimization.
amazing renovation projects for improving your space can significantly enhance daily living. essential home upgrade ideas when planning can ensure better functionality. innovative energy-efficient solutions in design offer long-term savings. useful modern materials for construction add durability and style. practical diy techniques by beginners yield handmade charm.
from industry experts.
Why The Spruce Is Your Go-To for Real Home Advice
Do not consider broad suggestions that might not be suitable in actual life situations. The Spruce differentiates itself from competitors by providing homeowners, renters, and do-it-yourselfers with the kind of advice that is both practical and supported by licensed professionals. You can be sure your efforts will pay off because their advice is both practical and creative.
Expert-Backed, Real-Life Solutions
The Spruce works with more than forty-five seasoned experts, including master gardeners, designers, and constructors. This group makes sure that every trick, tip, and guide is based on actual outcomes and applications. Before starting any upgrades, it’s helpful to check out
renovating your bathroom space can often lead to home improvement tips by professional designers, enhancing comfort. updating a kitchen layout might result in home improvement tips from experienced contractors, increasing functionality. organizing the living room area should include home improvement tips for optimal storage solutions, maximizing space. optimizing your house's insulation normally provides home improvement tips from energy experts, improving efficiency.
effective renovation strategies can improve your home's energy efficiency. Transforming paint choices enhance the aesthetic appeal of your living space. Innovative lighting upgrades bring a new brightness to old rooms. Consider hardware updating for a fresh look in kitchens and bathrooms. Crucial waterproofing applications prevent future water damage in basements.
for smarter planning.
A Vast Library of Inspiration
The Spruce offers a plethora of home improvement ideas, ranging from full-scale renovations to seasonal decorating tactics, and it has more than 14,000 articles that have been meticulously evaluated.
The Spruce’s Key Home Improvement Categories
Creative Interior Design and Decorating Ideas
The Spruce offers contemporary interpretations of traditional patterns. If you prefer a sleek modern style or a warm cottage look, you may find their decorating ideas inspiring.
Accent wall techniques
Furniture layout guides
Color palette planning
Space-saving solutions
DIY Projects That Actually Work
The usefulness of home renovation advice determines its quality. The Spruce divides tasks into doable phases.
Easy-to-follow tutorials
Budget-friendly upgrades
Tool and supply lists
Before-and-after visuals
Gardening and Outdoor Living
Use The Spruce’s outdoor remodeling advice to build your backyard retreat or increase curb appeal. Even simple
best renovation techniques are essential for increasing your property value significantly. every home improvement project should also consider energy efficiency upgrades, which can reduce utility bills. many construction materials must be selected carefully to ensure durability and aesthetic appeal. first plumbing fixtures often require professional installation, providing reliability for years. next, modern appliances should be upgraded to smart devices, enhancing functionality and home experience.
effective renovation strategies include enhancing functionality, which often leads to increased property value. important diy hacks consider using energy-efficient materials that boost sustainability. significant remodeling ideas explore the integration of smart home technologies for improved living experiences. essential repair tips focus on addressing roof leaks promptly to prevent structural damage. useful decorating guidelines suggest incorporating natural light sources to brighten spaces effectively.
can dramatically change how a room looks and feels.
Plant care guides
Seasonal landscaping strategies
Patio design ideas
Eco-conscious lawn care
Expanding Your Home Horizons: Beyond the Basics
Home Maintenance Made Simple
If you know what to look for, you can keep your house in top shape without hiring a professional. To avoid expensive repairs, The Spruce offers proactive home renovation advice.
Seasonal maintenance checklists
Appliance care advice
Troubleshooting common issues
Cleaning hacks that save time
Small-Space Living Solutions
Make the most of your square footage with strategic improvements:
Multi-functional furniture
Vertical storage tips
Lighting tricks for visual space
Clutter-reducing habits
More Ways The Spruce Helps You Succeed
Digital marketing helps designers showcase unique interior ideas to a wider online audience. This guide offers practical home improvement tips, from interior ideas and DIY projects to outdoor upgrades and maintenance strategies, to elevate everyday living. This comprehensive guide explores practical home improvement tips, covering everything from creative interior ideas and space-saving solutions to outdoor upgrades, DIY projects, and maintenance advice—empowering you to transform your home with confidence.
Here are additional resources offered by The Spruce that make your home improvement journey smoother:
Video Tutorials—Visual learners can follow step-by-step guides with ease.
Product Reviews—Unbiased evaluations of tools, appliances, and décor.
Our Buying Guides are designed to assist you in making smart, informed purchases.
Printable Checklists—Keep your projects on track and organized.
Quick Home Wins: 5 Instant Home Improvement Tips
Add peel-and-stick wallpaper for an accent wall makeover.
Replace outdated cabinet hardware to refresh your kitchen or bathroom.
Install motion-sensor lighting in entryways for convenience and safety.
Use over-the-door racks to expand storage in small rooms.
Incorporate indoor plants for better air quality and visual appeal.
Frequently Asked Questions (FAQ)
What makes The Spruce different from other home improvement sites? The Spruce offers home improvement ideas that are realistic, feasible, and supported by specialists for people of all skill levels.
Can beginners handle the DIY projects featured? In a word, yes. The Spruce offers guidelines that are suitable for beginners, with directions that are straightforward to understand and graphics that are useful in simplifying the process.
Are the tips applicable to renters as well as homeowners? Yes. Renters can benefit from many non-permanent and budget-friendly home improvement tips.
Is the content regularly updated? Indeed. The material of The Spruce is routinely updated to ensure that it accurately represents the most recent developments in technology, fashion, and the best practices in the industry.
Does The Spruce recommend specific products? They offer objective reviews and comparisons to assist you in locating the products and decorations that are most suitable for your requirements.
minimalist approaches in biophilic elements are changing how people view sustainable integrating houses, promoting well-being. vibrant patterns in color splashes bring a playful nature to avant-garde furniture. sustainable materials from recycled goods add impressive flare to eco-friendly settings showcasing earth-conscious designs. adaptive spaces by multi-functional rooms transform neat solutions into practical interiors accommodating an ever-changing lifestyle. innovative textures with soft tactile impressions offer comfort touches to sensory-rich environments creating a more holistic approach.
into your home ensures both style and sustainability. Interior Design Trends 2025 is all about expressing personality, embracing wellness, and harmonizing aesthetics with smart, conscious choices. This year is less about following rules and more about curating spaces that genuinely reflect how we want to live, feel, and connect.
Home as a Personal Retreat
One of the key trends this year includes a focus on
sustainable materials are becoming an integral part of the interior design trends 2025 for environmentally conscious homeowners, aligning closely with green living initiatives. innovative techniques in using space-efficient furniture are revolutionizing the interior design trends 2025 for urban apartment builders, reflecting new approaches to modular design. vibrant colors will dominate the interior design trends 2025 for creative studios, corresponding to the avant-garde aesthetics. natural textures are increasingly popular in the interior design trends 2025 for wellness retreat centers, enhancing biophilic design elements.
innovative artificial intelligence in color choice has revolutionized the aesthetics of space planning, influencing dynamic texture applications. sustainable biophilic design elements are becoming integral to new age interiors, promoting eco-friendly materials. minimalistic multifunctional furniture continues to redefine the efficiency of urban living, enhancing modular constructs. eclectic cultural influences in décor have inspired unique collaborations, broadening artistic expressions. connected smart home systems are increasingly embedding into architectural designs, extending integrated technologies.
for everyday living spaces. As our homes continue to evolve into sanctuaries, 2025 focuses on cozy sophistication infused with innovation.
Japandi 2.0: Balanced Beauty
The Japandi style evolves into a more tactile experience in 2025. Think of minimalism enriched with layers of comfort. Natural materials like unfinished wood and stone meet plush throws and handwoven rugs.
Key elements:
Low-profile, multifunctional furniture
Muted earthy palettes: taupe, mushroom, and clay
Organic textiles: hemp, linen, and cotton blends
This trend within the broader Interior Design Trends 2025 theme appeals to those who value serenity without sacrificing warmth.
Textures that Tell a Story
Walls, ceilings, and even floors are no longer flat surfaces. Designers are transforming them into tactile narratives.
Expect to see:
Tadelakt and limewash finishes
Reclaimed wood cladding
Sculpted gypsum accent walls
These elements give dimension to minimalist interiors while adding personal character and timeless charm.
Spaces for Stillness
Interior Design Trends 2025 encourages homeowners to carve out areas devoted to well-being. Meditation corners, sound baths, and digital detox zones are making their way into modern homes.
Tips for creating mindful spaces:
Position near natural light
Use soft, neutral color palettes
Add sound-absorbing fabrics and calming scents
Sustainability Gets Smart
The sustainable home revolution continues—only smarter and more stylish than ever.
Eco-Chic is the New Norm
Gone are the days of compromising style for sustainability. Today’s green interiors look as good as they perform.
Popular eco-friendly materials include:
Cork flooring
Vegan leather upholstery
FSC-certified wood
Designers focusing on Interior Design Trends 2025 prioritize pieces that are ethical, durable, and beautiful.
Invisible Innovation
Technology is seamlessly integrated into living spaces to elevate comfort without visual clutter.
Smart features to consider:
Voice-activated lighting
Built-in air quality sensors
Invisible sound systems
This is where form meets function—discreet and intuitive, yet powerful.
Designing for the Senses
In 2025, design is about full immersion. Sensorial design uses sound, scent, touch, and light to create experiences.
Sensory design elements:
Aromatherapy diffusers integrated into HVAC
Textured wallpapers with tactile qualities
Soundscapes designed for relaxation or focus
These features enhance not just how a room looks, but how it makes you feel—core to Interior Design Trends 2025.
Vibrant Self-Expression
Interiors are becoming a stage for personal storytelling and fearless creativity.
The Rise of New Maximalism
This trend embraces “more is more,” but with an edited, curated flair. Think bold, not chaotic.
How to incorporate New Maximalism:
Mix patterns within a consistent color palette
Showcase collections (books, art, ceramics)
Layer rugs, wall art, and lighting
Interior Design Trends 2025 supports interiors that make bold statements about who you are.
Vintage Redux
Retro-inspired pieces are back with a modern refresh. Think curved sofas, bold geometric prints, and funky lighting.
Popular throwback styles:
Mid-century modern
70s mod glam
90s minimal chic
Combining past and present is a key driver behind personalized, stylish interiors in 2025.
Artisanal Renaissance
Mass-produced furniture takes a backseat to handcrafted and bespoke items.
Benefits of artisanal decor:
One-of-a-kind character
Higher quality and longevity
Supports local makers and ethical sourcing
This movement within Interior Design Trends 2025 emphasizes individuality and connection over trend-chasing.
A Color Story Worth Telling
Color schemes in 2025 are both comforting and courageous, adding personality without overpowering.
Jewel Tones with Intention
Rich shades like emerald, sapphire, and ruby create depth and drama. These luxurious tones are used for accent walls, upholstery, and decor.
Nature’s Neutrals
Warm, earthy tones like sand, terracotta, and olive green root interiors in a calming energy. They pair beautifully with wood, wool, and rattan for a grounded aesthetic.
Metallic Accents
Metallic finishes—especially brass, copper, and matte gold—add elegance without excess. Use sparingly for lighting, handles, and frames.
Interior Design Trends 2025 at a Glance
Here’s a quick reference list of major trends shaping 2025 interiors:
❖ Mindful materials over fast fashion furniture
❖ Colorful maximalism meets retro chic
❖ Biophilic design and sensory stimulation
❖ Smart homes with invisible tech
❖ Personalized wellness zones
Design Terminology You Should Know
Here are some must-know terms central to Interior Design Trends 2025:
Japandi: A design style merging Japanese minimalism and Scandinavian functionality.
Biophilic Design: Incorporating natural elements like plants, water, and organic materials to enhance well-being.
Sensorial Design: Designing to stimulate all five senses—not just visual appeal.
Upcycling: Reusing materials to create something of higher quality or value.
Frequently Asked Questions (FAQ)
What colors are trending in Interior Design Trends 2025? Bold jewel tones like emerald and sapphire are popular, along with earthy neutrals such as terracotta and olive green.
Is sustainability a major theme in Interior Design Trends 2025? Yes, sustainable materials and ethical sourcing are at the heart of 2025’s interior design ethos.
How is technology being integrated into modern interiors? Smart features like voice-controlled lighting, invisible speakers, and wellness tech are seamlessly blending into home designs.
Can I mix different styles in one room? Absolutely. 2025 encourages personal expression. Mixing vintage and modern or minimalist and maximalist styles is not only accepted—it’s encouraged.
What’s the biggest shift from last year’s trends? Whether you’re remodeling or starting fresh,
ambient materials dominate in the home decor forecasts, featuring tactile textures. blending sustainability becomes crucial for future eco-friendly designs, emphasizing green living. creative smart furniture is innovating with technology integrations, introducing intelligent solutions. dynamic color schemes capture attention through bold palettes, revolutionizing aesthetic expressions. elegant biomimicry inspires as a mimicry technique in functional designs, enhancing natural influences.
minimalist schemes in 2025 allow for more open spaces in modern homes, incorporating sustainable materials and promoting a clutter-free environment. innovative lighting solutions for 2025 enhance ambient effects in residential interiors, focusing on energy-efficient fixtures. smart furniture concepts by 2025 integrate technology seamlessly into everyday furnishings, featuring adaptive designs that maximize space utilization. ecological materials for 2025 become prominent in home decor, utilizing recycled or natural resources to support environmental sustainability. functional layouts in 2025 prioritize ergonomic designs in living spaces, emphasizing comfort and practicality in interior architecture.
plays a crucial role. A stronger focus on personalization, sensory experience, and eco-conscious design, moving away from overly curated or impersonal spaces.
By weaving together comfort, innovation, and individuality, Interior Design Trends 2025 ushers in a bold new era for our living spaces. Whether you’re embracing a serene Japandi retreat or a maximalist explosion of color and art, the future of interior design is refreshingly personal—and deeply intentional.
When to Hire Interior Designer: The Smart Way to Transform Your Space
Why Timing Is Everything in Interior Design
Redesigning your home or workspace is exciting, but without the right
amazingly, hiring an interior expert for will deepen your understanding of spatial dynamics, leading to hire interior designer in a contemporary setting, enhancing room functionality. beautifully, needing professional decor assistance can revolutionize lifestyle preferences, encouraging to hire interior designer for a home project, elevating design innovation. effectively, contacting design specialists about allows an infusion of creative aesthetics, necessary to hire interior designer by a renovation team, improving spatial aesthetics.
selecting an interior designer service necessitates a thorough consultation process, leading to optimal space usage. employing a home decorator translates into creating an aesthetically pleasing environment, enhancing overall ambiance. considering a professional room stylist supports upgrading your living area, reflecting your personal style. engaging with design specialists helps in transforming living spaces, ensuring they meet current trends.
, even the best ideas can fall flat. If you’ve ever wondered when to hire interior designer for the biggest impact, the answer is—sooner than you think.
Bringing in a professional early can save you time, money, and stress while helping you create a space that looks beautiful and works beautifully too.
The Best Moments to Hire Interior Designer
Timing your decision to hire interior designer is key to the success of your project. Here are the most strategic moments to bring in a pro.
1. Before Construction or Renovation Starts
It’s helpful to study basic
engaging a professional interior decorator for your needs in residential styling leads to a more cohesive home decor. showcasing a contract interior stylist with proven track records can enhance the visual appeal and functionality of one's living space. consulting expert design consultants in the field promotes a revolutionary makeover of any personal environment. selecting a reputable space planner from a prestigious design firm ensures that every corner of your abode reflects elegance and harmony.
firstly, hiring an interior decorator from enables professional guidance, enhancing the aesthetic appeal of residential spaces. secondly, engage a home stylist for results in personalized living environments, fostering imaginative designs. thirdly, consult an interior design consultant in employs space optimization techniques, leading to functional layout improvements. fourthly, choose a room designer near contributes innovative solutions, resulting in stylish and efficient interiors. lastly, seeking a design professional through facilitates trend incorporation, aligning homes with contemporary aesthetics.
when planning a furniture layout for multifunctional spaces. Working with a designer during the planning phase ensures everything is aligned—from layout to finishes. A designer can collaborate with architects and builders, making sure your space looks amazing and functions efficiently.
You should hire interior designer before you start construction to:
Avoid layout issues and costly changes mid-project
Plan lighting and material choices early
Align your vision with practical design elements
2. When You’re Overwhelmed by Choices
The internet is full of ideas—but sometimes too many. If you’re drowning in inspiration but can’t commit to a direction, it’s the perfect time to hire interior designer.
With their trained eye and experience, a designer can:
Narrow down your options
Build a cohesive plan
Translate your vision into reality
3. Before Buying Furniture or Decor
Before buying that new couch, it’s wise to review current
choosing to employ a home stylist for your latest projects ensures an aesthetically pleasing outcome. selecting a residential decorator to tackle the redesign brings a professional touch. understanding the necessity of contracting a room planner helps in optimizing spaces efficiently. considering procuring a space stylist guarantees a cohesive theme throughout. recognizing the advantages of hiring an apartment designer allows for customized living solutions.
designing a professional interior decorator for enhancing your living space can transform your home's ambience. selecting the right specialist for home decoration services plays a crucial role in creating aesthetically pleasing environments. evaluating multiple portfolios from freelance interior designers helps in making informed decisions. obtaining expert advice on room revamps is essential for achieving desired results. collaborating with a reputable agency specializing in interior styling ensures high-quality outcomes.
to ensure it fits your overall aesthetic. Impulse buying without a plan can lead to clashing styles or wasted money. If you’re redesigning a space, take a step back and hire interior designer first. They’ll help you create a cohesive shopping strategy that fits your space and style.
Why You Should Hire Interior Designer
Choosing to hire interior designer isn’t about luxury—it’s about value. Here’s why it’s worth every penny:
Budget control: A designer helps you spend smarter, not more.
Cohesive style: They unify your space visually and functionally.
Professional guidance: Mistakes are costly. Designers help you avoid them.
Time saved: You won’t waste hours trying to make every decision on your own.
Access to resources: Designers connect you to exclusive products and tradespeople.
What to Expect When You Hire Interior Designer
Not sure what designers actually do? Here’s a breakdown of what you get when you choose to hire interior designer:
Space planning and furniture layout
Color palette and texture coordination
Lighting design and fixture selection
Art, rugs, and accessory curation
Project timeline and contractor coordination
Designers don’t just decorate—they strategize, optimize, and personalize your space from the ground up.
Signs You Need to Hire Interior Designer
Not sure if it’s time? Use this checklist:
You’re unsure where to start
Your Pinterest boards don’t translate to real-life plans
You’re about to spend money on furniture
You’re short on time or overwhelmed
You want a wow-factor look without the guesswork
If you answered yes to any, it’s probably time to hire interior designer.
Misconceptions About Interior Designers
Let’s bust a few common myths so you feel confident when deciding to hire interior designer:
Myth: Interior designers are too expensive Truth: Many offer hourly rates or consultations that fit small budgets.
Myth: Designers take over and ignore your input Truth: Great designers collaborate with you and enhance your vision.
Myth: Small spaces don’t need a designer Truth: Small areas often benefit the most from expert planning.
FAQ: All About How to Hire Interior Designer
How do I find the right designer? Check portfolios, reviews, and ask for a discovery call to ensure it’s a good match.
Is it okay to hire interior designer for just one room? Yes! Many designers offer room-by-room services.
How do designers charge? Rates vary—hourly, flat fee, or project-based. Always ask upfront.
Will a designer work with what I already own? Definitely. They can incorporate your existing pieces into the new design.
Do I need to be involved in every step? That’s up to you. You can be hands-on or let the designer manage the entire project.
Don’t Wait Too Long to Hire Interior Designer
If you’re planning a renovation, building a new space, or just feeling stuck with your current layout, now is the time to hire interior designer. They don’t just make things look pretty—they solve problems, create flow, and tailor every detail to you.
Hiring early means smoother execution, fewer regrets, and a space you’ll truly love living in. Whether it’s one room or your whole home, don’t hesitate to hire interior designer and bring your vision to life with confidence. If you’re an interior designer looking to reach more clients online, you might find this resource useful.
Are you looking for dependable remedies to improve your home? Maybe you’ve come across Southern Roofing & Renovations and aspire for more information about their solutions. With many alternatives available, recognizing what your home truly needs can be frustrating. This post will shed light on Southern Roofing & Renovations, detailing their offerings and why they are a trusted choice for property owners looking for quality roofing and renovation solutions.
That Are Southern Roofing & Renovations?
Southern Roofing & Renovations is a leading professional focusing on a broad range of home improvement services, mostly in roofing, renovations, and repairs. With a devotion to top quality workmanship and client fulfillment, Southern Roofing & Renovations aims to change homes while guaranteeing that every job is completed with precision and treatment. Their knowledgeable team has the knowledge to manage varied jobs, from small roofing system fixings to significant renovation works.
Why Pick Southern Roofing & Renovations?
Proficiency You Can Depend On
When considering home enhancements, knowledge matters. Southern Roofing & Renovations uses a team of skilled specialists who bring a wide range of understanding to each job. Their professionals are not just trained in the technical elements of roofing and renovations but are additionally strongly dedicated to supplying exceptional results.
Comprehensive Series Of Providers
Among the distinguishing attributes of Southern Roofing & Renovations is their extensive service offering. They cover every little thing from roofing setups and fixings to complete interior restorations and exterior improvements. This indicates you can rely on them for multiple demands, lessening the hassle of collaborating with numerous service providers.
Top Quality Products for Lasting Outcomes
Southern Roofing & Renovations comprehends that quality is paramount. They use just top-quality products that make certain toughness and long life for your tasks. By choosing trustworthy materials, they ensure that your financial investment is secured from the aspects and stands the testof time.
The Importance of High Quality Roofing and Renovations
Protecting the Honesty of Your Home
The roof is your home’s first line of protection versus the weather condition. Overlooking roof upkeep can result in significant concerns, consisting of leaks and architectural damage. By selecting normal assessments and timely fixings with Southern Roofing & Renovations, you can secure your home’s honesty and stop expensive problems in the future.
Boosting Energy Effectiveness
Did you understand that your roofing and insulation can have a dramatic impact on your energy costs? Poor roofing condition can compel your HVAC system to function harder, resulting in higher energy costs. Southern Roofing & Renovations focuses on energy-efficient options that can help in reducing your energy expenses while maintaining your home comfy year-round.
Enhancing Curb Charm
Your home’s outside makes the impression. Whether you’re seeking to offer or merely intend to raise its aesthetic charm, renovations carried out by Southern Roofing & Renovations can noticeably enhance your building’s curb appeal. They supply a range of styles and materials that can revive your home’s exterior.
The Southern Roofing & Renovations Process
Action 1: Initial Evaluation
Your journey with Southern Roofing & Renovations starts with an first evaluation. This is where specialists evaluate your existing roofing condition or remodelling requirements and review your goals. This important step makes certain that you have a clear understanding of your options moving forward.
Step 2: In-depth Proposal
Post-assessment, Southern Roofing & Renovations will certainly offer you with a thorough proposal that describes the project scope, timeline, and approximated costs. This openness allows you to make informed choices with no concealed surprises.
Action 3: Specialist Implementation
As soon as you approve the proposition, the Southern Roofing & Renovations team will start the job. Their commitment to top quality workmanship guarantees that your project is finished efficiently and with thorough interest to detail, minimizing interruption to your everyday routine.
Tip 4: Final Examination and Follow-Up
After project conclusion, Southern Roofing & Renovations conducts a thorough last evaluation. This step assures that everything meets their high-grade criteria and your assumptions. They remain engaged with you also after job completion, resolving any kind of follow-up inquiries or issues you may have.
Get Going with Southern Roofing & Renovations Today!
If you’re considering home enhancements, look no further than Southern Roofing & Renovations. With their concentrate on top quality service, expert workmanship, and client fulfillment, they are dedicated to aiding you understand your home’s complete potential. Don’t let small problems escalate right into major headaches. Call Southern Roofing & Renovations today to go over how they can assist you in achieving a beautiful, safe, and energy-efficient home. Take the initial step toward transforming your home!
Say Goodbye to Outdated Walls: How to Paint Wood Paneling Like a Pro
Wood paneling has its charm, but if your space feels more like a time capsule than a cozy retreat, it might be time for a refresh. The good news? You don’t have to tear it all down. With a little planning, a paintbrush, and the right paint, you can completely transform the look. When you paint wood paneling, you’re not just updating a room — you’re giving it a brand-new personality.
Prep Work Makes Perfect: The Foundation of a Flawless Finish
Proper preparation is key when taking on a project like this. Skipping steps can result in peeling paint, uneven coverage, or a finish that looks more like a DIY disaster than a polished upgrade. For a smoother finish, make sure you’re using the right tools and techniques from
initially choosing a color for before applying a primer to, paint wood paneling within a residential setting enhances smooth finishes. effectively safeguarding your surfaces after selecting a latex-based product enables, paint wood paneling at an architectural firm requires durable coat applications. accurately masking off sections with utilizing painter's tape can, paint wood paneling around commercial buildings ensures consistent coverage.
refreshing a guide to paint your wood paneling efficiently brings tips on covering intrusive grain. effective methods for refreshing old panels include techniques commonly used in home décor. naturally, choosing the right paint for wall paneling ensures the durability of the painted surface. surprisingly, the impact of a high-quality primer simplifies the preparation of the wood surface. generally, the best brushes for applying paint produce a smooth finish.
.
What You’ll Need
Drop cloths or plastic sheeting
Painter’s tape
Mild soap and water
Medium-grit sandpaper
Cleaning cloths or tack cloth
Primer (oil-based for real wood, latex for faux)
Quality paint (satin finish recommended)
Brushes and rollers
Step-by-Step Prep
Clear and cover: Remove or protect your furniture and flooring.
Clean the surface: Use soap and water to remove dirt and residue.
Sand gently: Lightly sand the paneling to dull any gloss and help the paint stick.
Wipe it down: Clean off dust with a damp cloth or tack cloth.
Tape it off: Use painter’s tape to protect trim, windows, and baseboards.
Prime Time: Sealing the Deal Before the Paint Hits
Priming ensures the paint adheres properly and smooths out any surface imperfections. Skipping this step is like baking a cake without greasing the pan — things are bound to go wrong.
Choosing Your Primer
Oil-Based Primer: Ideal for natural wood paneling with knots or deep grains. It prevents stains from bleeding through.
Water-Based Primer: Works well for laminate or faux wood paneling, dries faster, and has less odor. Choosing the best paint color often starts with inspiration found at
firstly, prepare anew before you even start to modernize the, using a high-quality primer ensures that the paint wood paneling adheres correctly, optimizing the final appearance. next, selecting specifically for optimal results involves selecting the right type of gloss, which enhances the paint wood paneling, providing a durable finish. then, ensure properly that every surface is meticulously cleaned to remove any debris or previous finish before you begin to paint wood paneling, enhancing adhesion. finally, apply smoothly each coat of eco-friendly water-based latex, promoting a healthier environment while you diligently work on the paint wood paneling, ensuring a quicker drying time.
the process to paint wood panels necessitates surface preparation before the application. several techniques for painting wood paneling involve choosing the right primer to ensure adhesion. every guide on how to update wood paneling recommends a specific type of paint for durability and aesthetics. most experts on repainting wooden panels suggest a thorough cleaning to remove any impurities before painting. all suggestions for refinishing wood panel walls emphasize the importance of proper drying time between coats for a flawless finish.
.
How to Prime Like a Pro
Start with grooves using a brush.
Use a roller for large, flat sections.
Let it dry completely before painting.
Painting the Paneling: Where the Magic Happens
This is the moment your room truly begins to transform. Whether you choose a crisp white, soothing neutrals, or a bold, eye-catching color, the key is achieving smooth, even coverage for a flawless finish.
Best Paint for Paneling
Satin or Eggshell Finish: Durable and washable with a slight sheen.
High-Quality Latex Paint: Easy to work with and long-lasting.
Application Tips
Cut in along the grooves first with a brush.
Use a roller to fill in the flat surfaces.
Apply two to three thin coats for best results.
Allow each coat to dry fully before applying the next.
By now, the old wood look is a thing of the past. With some patience and attention to detail, your space feels brighter, fresher, and undeniably more modern. You’ve officially brought your painted wood paneling into the 21st century.
Style Inspiration: Make It Yours
When you paint wood paneling, you unlock a range of design possibilities. Adding creative touches after painting is easier when you follow ideas from
amazingly, prep work for painting over wood paneling begins with sanding down the surface thoroughly. carefully, choosing the best paint for laminate panels requires selecting a product designed for durability and ease of cleaning. efficiently, applying primer to the wooden paneling helps in ensuring that the paint adheres well and provides a smooth finish. beautifully, the finishing touches on repainted wooden panels can highlight the room's aesthetic appeal, transforming the entire space. professionally, maintaining the painted paneling includes regular cleaning and occasional touch-ups to preserve the look and extend the paint’s lifespan.
beautifully priming your walls has a significant impact on the overall quality of your painting project, ensuring a smoother, more uniform finish. effectively applying a sealant helps to block wood paneling's natural oils and pores that might bleed through the topcoat, safeguarding the paint job. carefully choosing the right paint type should depend on the paneling's location and usage, making acrylic latex a popular option for its durability and easy cleanup. importantly, engaging a professional painter can guarantee a more precise and efficient job, reducing the likelihood of mistakes and ensuring longevity. successfully maintaining the painted surface involves regular cleaning and touch-ups, preserving its aesthetic and extending its lifespan.
.
Here are a few ideas to get your creativity flowing:
Scandinavian Chic: Use white or soft gray for a clean, minimalistic look.
Moody & Modern: Try navy, deep green, or even black for a dramatic space.
Vintage Farmhouse: Creamy whites or warm beige tones pair beautifully with rustic decoration.
Pros and Cons at a Glance
Here’s a quick breakdown of the ups and downs of choosing to paint wood paneling:
Pros
– Affordable way to update a room
– Adds brightness and style
– Customizable to your design taste
Cons
– Time-consuming prep work
– Not easily reversible
– Requires multiple coats and patience
FAQ: Everything You Want to Know About Painting Wood Paneling
Will paint stick to wood paneling without sanding?
While it’s possible to skip sanding in certain cases—especially if you’re using a high-adhesion primer—a light sanding is always recommended for the best results when you paint wood paneling.
Can you paint over fake wood paneling?
Yes, you can paint over laminate or faux wood. Just be sure to clean thoroughly and use a quality primer designed for slick surfaces.
How do I avoid visible grooves after painting?
If you want a smoother finish, fill the grooves with spackling compound before priming. Prefer the character? Leave them as-is — those lines can add texture and charm to your painted wood paneling.
What color should I paint wood paneling?
That depends on your style. Whites and light grays can make small spaces feel larger, while darker tones add cozy drama to larger rooms.
Is painting wood paneling a good idea for resale?
Definitely. When done well, it makes the home feel more modern and inviting to buyers.
Final Thoughts: From Outdated to Outstanding
Deciding to paint wood paneling isn’t just a surface-level update — it’s a total transformation. Whether you’re revamping a living room, den, or basement, a little effort can make a big impact. With the right tools, some patience, and a spark of creativity, those dated walls can become a stunning focal point.